| ADIVA Release 9.5 |
|
| DRC - WEB ARCHIVE |
| Communication of DRC Violations can be a simple process by creating a web page of an error. This is all done through a single button click with the violation displayed on the screen. A matrix of violation types is also created allowing ease of understanding what items have been archived for review. Once violations have been archived, these files can be zipped and mailed to someone for review/repair or posted on a web server for remote review and comment. |
|
The following steps will create a
directory of data that generates a web page of violations.
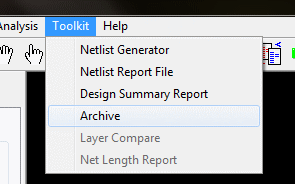
With a violation of some type on the screen, select TOOLKIT
then ARCHIVE or select the Web icon in
the toolbar.... |
|
|
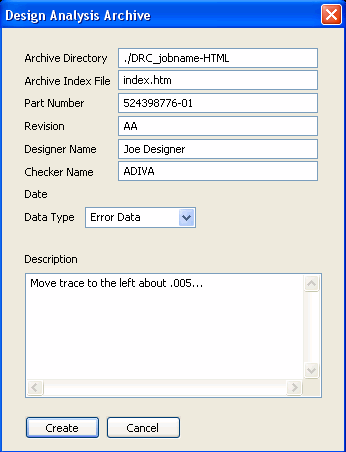
| Once ARCHIVE
is selected, a new panel will appear looking for setup
information. This information should be filled in as complete
as possible... |
|
| Archive Directory:
This defines the location to place all generated HTML data.
Default is in a new directory created in the current project
directory. Of course this can be changed to any location
across a network as long as the user has write privileges to this
directory. If the directory does not exist, one will be
created.
Archive Index File: This is the name of the main file used to open and view any HTML generated data. It is the main front page of the archive and contains the matrix of errors archived. Part Number, Revision, Designer Name and Checker Name: should be filled in to reflect this design. Data Type: If the data about to be archived is a design rule violation, then this should be set to Error Data. With this setting, details about the violation will be included with the picture of the error. The optional setting is Reference Data. This setting generates a picture of the current screen. An alert will appear when the Archive button is selected asking for a document title/description of the data being archived. The scrolling area is designed to allow the entry of any descriptive text to associate with the snap-shot of any screen. This text will appear directly above the image in the final product. There is no limit to the amount of data that may be entered here. Select CREATE to save a web page formatted image of the violation or data displayed as seen on the AdivaTools graphics interface. Allow a second or two for the image to be processed. Select CANCEL to close this panel. |
|
| Using DRC Archive
Once the DRC Archive panel is filled in, its best to slide the panel off to the side for later access. Then perform a few checks and ViolSeek any violations found. Enter descriptive text if desired and then select the CREATE button to take a screen shot of the violation found. Remember, the picture on the web page will look EXACTLY like the picture currently on the DRC screen so zoom and fit images appropriately. It only takes a second or two to generate the image. ViolSeek to another violation, enter descriptive text if desired and select CREATE to create another web page of a violation. Continue in this manner until all violations are archived. Viewing Results in a Web Browser To view the archive, open a web browser and navigate to
the directory containing the created pages (this is the first entry of
the Archive panel). Find the file "index.htm" and open this
file in a web browser. A matrix should appear listing the
design information and a series of hyperlinks describing a
violation. Click on a link to view the violation.
Make use of the browsers back button to return to the matrix of
violations and select another for viewing. |
| Tips for
Customization
The HTML index page can be customized to include company logos, names, data locations, etc. This is setup through the application Settings file which resides in the ADIVA "data" directory called "Settings.txt". In this file, there are several entries that may be edited for personal definition. These are: AdivaTools.Logo: <path to
customer logo> AdivaTools.Logo defines the location of a corporate logo. Change this setting to use a personal logo in either .gif or .jpg image format.. AdivaTools.CompanyName defines the corporation name to be placed on the web pages. AdivaTools.HtmlBackgroundColor should not be modified. AdivaTools.ArchiveDir is where all of the HTML archive data is placed. Notice it defaults to "." meaning a directory is placed below the current working directory. This is typical yet may be reset to a corporate web location if desired. AdivaTools.ArchiveIndexFileName is
the name of the main file used for opening in a web browser - default
entry should not be changed. |
|
Copyright © 1989 - 2021 ADIVA Corporation |